I mean, you know what they say, "One woman's junk is another woman's treasure."
Homemade ornaments using old nail polish you have sitting in your junk drawer!
The holidays are coming up and I have been looking into sprucing up my Christmas Decorations.
I have had the same set of Christmas ornaments since I got married. They're still nice but- I'm bored with them. I have been noticing a lot of posts about painted glass ornaments and looked through acrylic paints I already had, but they didn't really fit the color scheme I was in search of. Completely by coincidence, the other day I decided to reorganize my linen closet and came across my nail polish bin.
There were so many great colors.. however when I opened the cap, the nail polish was old, expired and too sticky for normal application.
Light bulb moment!
Why couldn't I use these old nail polishes-- I had paid good money for (seriously essie, $8 a bottle! Get real... but I love you and I'll still buy you..) go to waste?
Answer: I wouldn't.
Below find detailed instructions and pictures on how to make your very own nail polish ornaments!
You will need:
-a set of glass ornaments (any size) I want to try smaller ones next time.
- nail polish of your choice
-a jar or cup stuffed with paper towel


Row 3: China Glaze Santa Red My List


You will need:
-a set of glass ornaments (any size) I want to try smaller ones next time.
- nail polish of your choice
-a jar or cup stuffed with paper towel

First Step:
Remove the top of the ornament and set aside. You won't be needing it for a while, but you will need it again.

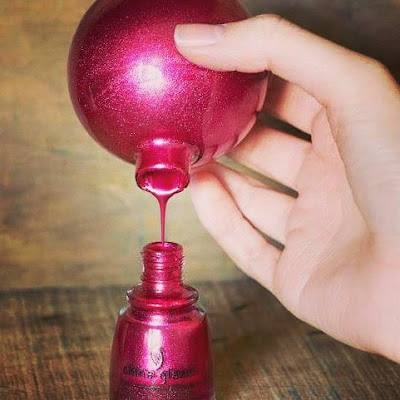
Step Two:
Pour your desired amount of nail polish into the glass ornament. More is best, as you can always dump out excess polish, but adding more will leave your glass ornament with different shades of color.

Step Three:
Dump out as much excess polish that you can back into the nail polish's original container. This way you can make more glass ornaments in the same color. You won't be able to get everything back into the bottle, but drain out as much as you can.

Last Step:
Set up your glass ornament upside down in the glass jar that has been lined with paper towel. I let my ornaments sit like that overnight just to be sure it was drained and dried. Then put that topper back on and place that beautiful baby on the tree!

*Editor's Note* I used about 1/5-1/4 of nail polish for each glass ornament.
Pretty much any polish will work but polishes with glitter, heavy shimmer or holographic features produce the most dramatic and aesthetically pleasing effects.
Here I have, from left to right:
Row 1: KBShimmer Don't Pink Twice, Teal Another Tail, Will Yule Marry Me?
Row 2: OPI DS Pewter, OPI Silent Stars Go By, Zoya ChitaRow 3: China Glaze Santa Red My List
I made about 30 of these in 2-3 hours (obviously not including 'drying time'). They were super fun to make and honestly, I think I'm obsessed...
Bonus: If you use old polish you can just tell your husband, boyfriend, mom, dad, friends, dog, whatevs that you are being thrifty
so... they can't judge you!

A GIANT 'Thank You' to my friend Melanie Fisher for taking these stunning photographs. Much better than my camera phone I will tell you that!
Let me know if you would like to see more of these types of posts. I am thinking about doing a 12 Days of Christmas Series starting December 1st and would love any and all input.
Have a fabulous day!

No comments:
Post a Comment